Articulate Storyline on Mac
How to install Articulate Storyline on Apple Mac
Whilst Articulate Storyline software is only available for the Windows operating systems, you can successfully install and use these products on your Apple Mac using Apple Boot Camp and optionally Parallels Desktop or VMware Fusion. These notes are designed to help you understand what’s involved in doing this so you can decide if you want to explore these options.
Whilst you will find specific information and instructions about this topic on the web and on the Articulate website itself, it often jumps straight into the technical aspects and “How-To” details. This is all very helpful once you know that this is what you want to do, how it works and what you can expect. This document is intended to introduce you to the topic in general terms, rather than explain the technical parts. You can then decide if it’s for you and if you will perform the required installation and configuration, or seek help from someone else.
More information on this topic can be found on the Articulate Support website here: Using Articulate Software on a Mac with Parallels Desktop
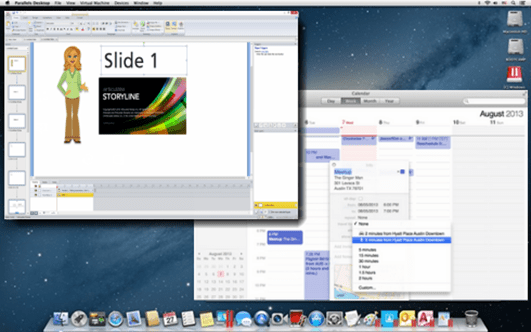
IMPORTANT NOTE: The following information is provided to help you understand the concepts involved in “how” Articulate Storyline can be used on your Mac. MicroWay strongly advises that you get assistance from someone who knows what they are doing and ensure you have made a backup of your system before you start this process. Please be clear that we are not in a position to support you with this and that only Windows OS is an officially supported platform for Articulate. Having said that, there is a lot of information on the web about this – including on Articulates own site. Many customers are successfully and happily using Articulate Storyline on their Mac using these techniques.
Tech
Apple Bootcamp
Purpose
Apple Bootcamp divides the hard drive in your Mac into a Mac partition and a Windows partition.
Your Mac’s hard drive starts out life being entirely Mac format.
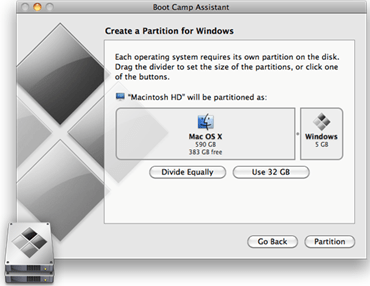
Apple Bootcamp takes a portion of the free space and converts it to a Windows partition – which will appear and operate like an entirely separate hard drive.
Apple Bootcamp then installs Windows into this new partition.
Your Mac can now boot from either its normal Mac hard drive (and be a Mac) OR from the new Windows hard drive (and be a Windows PC). So you can choose which Operating system your Mac runs when you turn it on.
You then install any Windows applications you want or need to use when you’re running Windows.
With Apple Bootcamp alone, you have to choose between Windows or Mac operating system at start-up.
For more information on How-To setup Apple Boot Camp, please visit Apple Support.
To use Windows and Mac applications side-by-side at the same time, directly from your existing Bootcamp partition you need to also add Parallels Desktop OR VMWare Fusion – see below.
Comments
Apple Bootcamp is a FREE feature included in Mac OSX.
This is a non-destructive process and does not damage your existing Mac OS or data. But it’s always best to have a full back up before you start this process just-in-case.
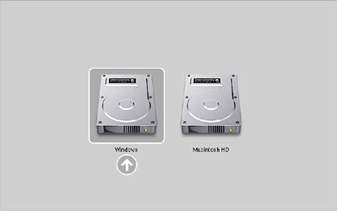
When you turn your Mac on (from a complete shut-down) AND hold down the Option (Opt) key at the same time, you will be presented with a list of available hard drives you can boot from.
Selecting the Windows drive will boot your Apple hardware (iMac or MacBook) with the Windows OS – you will not be loading or seeing any Mac operating system as it is not being loaded in any way. You’re now using a Windows PC. As such you can load and run Windows software on it – so Articulate Storyline will install and run just fine.
Installing Office and Articulate
Install Microsoft Office first, before you install Articulate Storyline.
Articulate Storyline are “Windows Only” applications – so you need to install them AND any other Windows software they depend on (ie: Microsoft Office) onto your Windows partition (ie: when you’re Mac is booted as a Windows PC).
Don’t “Activate” your Office or Storyline until you have finished installing and testing your setup. Activation is based on the Machine ID of your system, but when you add Parallels or Fusion, this creates a “virtual machine” which has a different Machine ID to your physical machine. So if you plan to use Parallel or Fusion, wait until you have that installed AND created a new Virtual Machine using your Boot Camp partition as the source. Only once you’ve complete this should you “Activate” your Windows OS, Office and Articulate products.
Tech
Parallels Desktop
Purpose
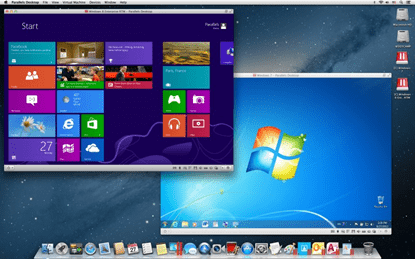
With Parallels Desktop, you don’t have to choose between Windows OR Mac at start-up. You just start your Mac from the Mac OSX partition and use it as a Mac as usual. But with Parallels Desktop installed you can then run the Windows OS at the same time and have it sit on your Mac OSX desktop in a window ( or full screen, or on another Mac virtual “desktop” on your Mac is the ideal way to use it.)
Coherence Mode
There is also a mode called “Coherence” in which you don’t see any of the Windows OS itself – just the Windows application windows sitting on the Mac OSX desktop as if it was a Mac application!!

(note you don’t have to see the full Windows OS)
Comments
The is a separate licensing cost for Parallels Desktop – more details available here: Parallels Desktop
See ADDITIONAL NOTES at the end of this document for some known issues / things you should be aware of when setting up.
Once you have Parallels and Apple Boot Camp setup, you can start the Windows OS running inside a window on you Mac. Allowing you to keep using your Mac applications but also use Articulate Storyline within the Windows OS window.
TIP: An ideal way to run Windows on your Mac with Parallels Desktop is to make the Windows OS window go full-screen. This then creates a second Desktop (one that is full-screen windows with no Mac parts showing) and you can easily and quickly flick between Mac and Windows with a 3-fingered swipe gesture on your mouse or track pad.
This keeps it very clean and clear in your mind which system you are using at the time.
When you enable “Coherence” mode, you can have just the Windows application itself on the Mac desktop. This looks cool as it looks like Storyline is running on the Mac. But it can get a little confusing at times when you forget it’s not a Mac app. See TIP above for what might be a better way for you too.
Tech
VMWare Fusion

Purpose
Purpose is the same as Parallels Desktop.
You only need Parallels Desktop OR VMware Fusion – you don’t need both as they do the same thing
Comments
The is a separate licensing cost for VMWare Fusion – more details available here: VMware Fusion
The way you install and use Fusion is naturally a little different to Parallels desktop, but the concept is the same. More Information about installing and using VMWare fusion is available at the link above.
Additional Information
Here are some links that address some specific topics you may find useful when setting up Articulate to run on you Mac.
Here are a few important tips for running Articulate software in a Mac environment with Parallels:
- First, disable the Shared Profile within Parallels, so all of the default Windows folders reside in the Windows environment and not in the Mac environment. For more information on this, please see this KB article provided by Parallels.
- After disabling the Shared Profile, you must completely uninstall and then reinstall the Articulate software. This step is only necessary if the Shared Profile feature was enabled previously.
- Make sure that your Articulate project files are saved in the Windows environment and not in the shared environment. Save your Articulate projects in a folder that is located on the Windows installation. For example: C:\Users\Administrator\Documents\
Also, follow these best practices when working with the Articulate products in Parallels:
- Audio, video, and image resources that you want to insert into your Articulate content must be located in the Parallels/Windows environment, not the Mac. Copy and paste any files that you’ll need to the Windows environment prior to inserting them into your presentation.
- Make sure you’re saving your Articulate projects to the Parallels/Windows environment, not the Mac. The default location would be C:\Users\Administrator\Documents\My Articulate Projects.
- Make sure you publish any project to the Parallels/Windows environment, not the Mac. The default location would be C:\Users\Administrator\Documents\My Articulate Projects
- Never work from a network drive or a USB drive. If an existing project resides on this drive, you must first copy it to the Parallels/Windows environment before working with it. (Note: Articulate Presenter presentations have two files that need to be transferred—the PowerPoint ile and the Articulate (.ppta) file. These two files must have the same file name and should never be separated.)
Articulate Storyline DPI support – Articulate Storyline doesn’t currently support 120 DPI. If your system is set to 120 DPI, you may experience erratic behaviour. This is not a Mac specific issue – any PC with a high DPI screen (inc MacBook Pro with Retina) is affected. Many other applications have the same issues with high DPI.
